Character Consistency Across Scenes: Prompting Strategies That Work.
Keeping a character looking the same across multiple generated scenes is one of the hardest prompting problems. These strategies actually solve it.
Why Characters Drift Between Scenes

Generative image and video models are stateless at inference. Each prompt is sampled independently, with no built-in memory of what came before unless the product explicitly layers sequence logic on top. That single architectural fact is the root cause of every character consistency problem in AI-assisted production.
There is no internal register storing "the character I generated three prompts ago." The model interprets each instruction fresh, drawing on its training distribution rather than your previous outputs. Identity must be reconstructed from scratch every time, and unless you give it something concrete to reconstruct from, it will drift.
The drift surfaces differently depending on your discipline. A game developer building concept sheets for an armoured figure finds the emblem changes shape between the front and back view. A graphic designer generating a brand mascot for a marketing carousel discovers that the character's head-to-body ratio quietly shifts from tile to tile. A storyboard artist working on film pre-vis watches the lead character's hair length fluctuate between scenes, or a costume detail disappear entirely by the third shot.
It helps to think of drift in two categories:
- Structural drift covers body proportions, facial identity, costume components, and distinguishing features. This is the kind that breaks character recognition entirely.
- Stylistic drift covers lighting interpretation, colour palette, and rendering style. The character may look structurally similar but feel like a different production from shot to shot.
Both types compound each other. A brand mascot that shifts from flat illustration to soft CGI halfway through a campaign deck has both problems at once, and they are harder to catch because the eye adjusts to each image individually.
Research on consistent character generation for text-to-image diffusion confirms that coherent identity must be actively "funnelled" through iteration or fine-tuning. Baseline models produce identity drift by default. No single technique eliminates it entirely. What works is a layered approach: text anchors, reference imagery, and parameter control used together, not independently.
Drift is not a prompt-wording problem. It is a system problem. The solution is building the system once, not writing better descriptions each time.
Build a Character Anchor: The Reference Block Method

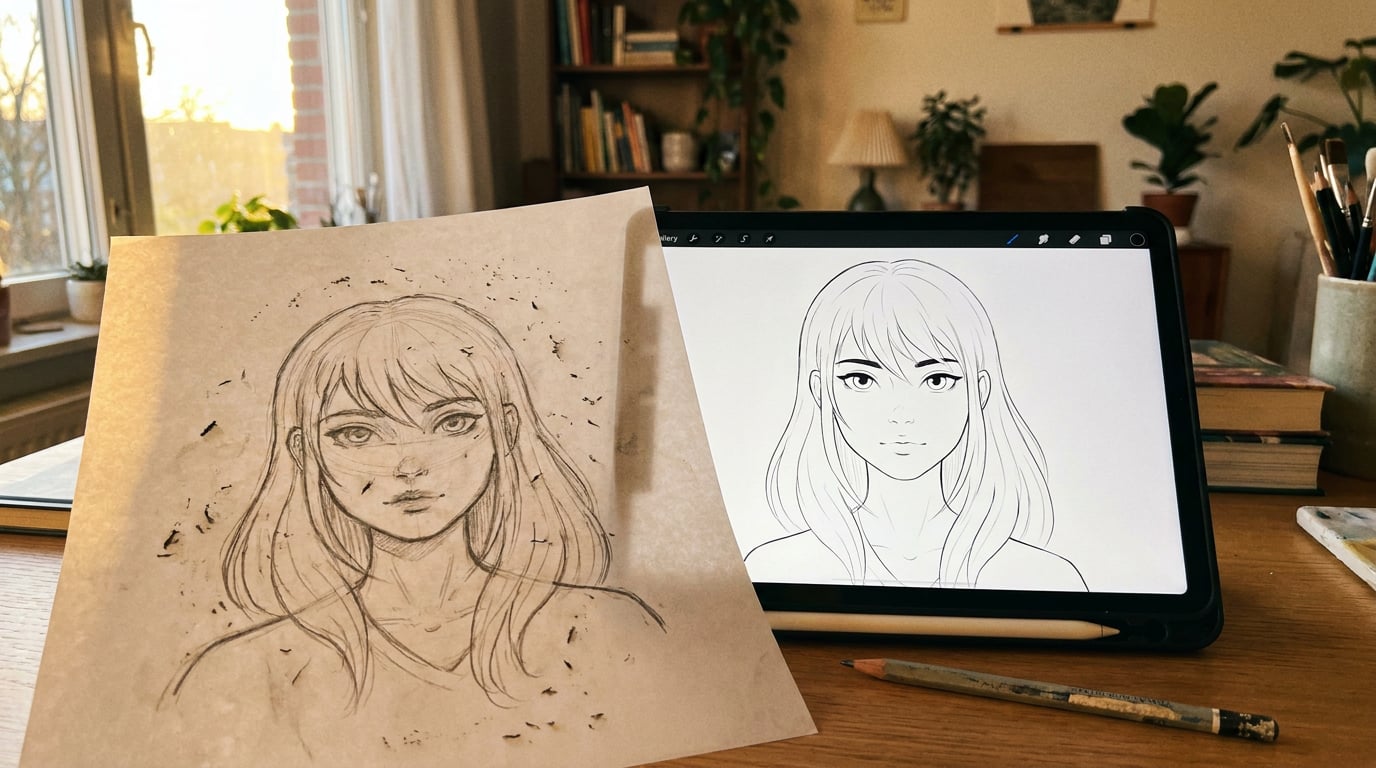
A character anchor is a fixed block of descriptive text that travels with every scene prompt, unchanged, verbatim. It covers appearance, clothing, proportions, and distinguishing features in enough detail to constrain the model's interpretation before the scene instruction pulls it in a different direction.
Kling's published character consistency guide recommends structuring prompts in a consistent sequence: character description, action or pose, setting, style and quality modifiers. It advises using precise measurements and colour codes for persistent features, and reusing the same description string across every prompt rather than paraphrasing. That last point is critical and easy to underestimate. Synonym substitution introduces drift. "Cobalt jacket" and "deep blue coat" are not the same instruction to a diffusion model.
Specificity consistently outperforms poetic or evocative language for identity retention. "Cobalt blue asymmetric jacket, brass toggle buttons, left sleeve rolled to the elbow" gives the model four separate constraints to satisfy simultaneously. "A stylish blue jacket" gives it none.
In practice, an anchor block runs to roughly 40–80 words. Long enough to lock identity across structural and stylistic dimensions, short enough that it does not crowd out the scene instruction. Here is how that looks across three disciplines:
| Discipline | Anchor block elements | Example detail |
|---|---|---|
| Game character | Species, armour colour, emblem shape, weapon type, hair and eye colour, silhouette | "Human female, 175 cm, obsidian plate armour with a gold phoenix crest on the left pauldron, twin short swords crossed at the back, waist-length silver braid, violet eyes" |
| Brand mascot (graphic design) | Geometric shape grammar, Pantone or HEX colour codes, expression style, limb proportions | "Rounded teardrop body, #FF4D1C orange with a 4 px #1A1A1A outline, large semicircle eyes, short stubby arms ending in three rounded fingers, always neutral-happy expression" |
| Automotive concept presenter | Height and build, tailored suit details, fabric colour and texture, skin tone | "Tall slim male, mid-40s, charcoal herringbone wool suit, single-breasted, white spread-collar shirt, no tie, warm medium-brown skin tone, close-cropped dark grey hair" |
Write this anchor block once and store it in Stensyl's Write studio. Write gives you a long-form document environment with a multi-model picker, which makes it a clean place to draft and version your anchor text. From there you can copy it directly into any image or video prompt without reformatting. Having it in one document also means any update to the anchor propagates the moment you paste it again, rather than hunting through saved prompts for the version you were using last week.
Write the anchor once, store it in Write, paste it verbatim. Paraphrasing between scenes is the single fastest way to undo every other consistency measure you have put in place.
Keyframe Locking: Using First and Last Frames to Hold a Character
Text anchors work well for image generation. For video, they need a visual counterpart. That is where keyframe locking comes in.
Stensyl's Boards surface is a fluid canvas where you can collect reference imagery and group frames into start and end scenes for video generation. The practical workflow for character consistency starts there: generate a strong reference frame of your character in a neutral pose, clear face, costume fully visible, controlled lighting. Pin that frame as the start keyframe in Boards, and use it as the fixed opening for each new scene clip.
This gives the video model a visual anchor rather than asking it to reconstruct identity from text alone. The model begins from a known state rather than interpreting the description from scratch. For Luma Ray 3.2 specifically, start and end keyframe conditioning is a core part of the model's design, with both 5-second and 10-second outputs available. Pinning your approved character reference as the opening frame of each clip is the most direct way to exploit that capability.
The limitation is worth stating clearly. Keyframe locking gives the model a strong constraint on pose, costume silhouette, and broad lighting context at the start of a clip. It does not guarantee that fine details, small logos, jewellery, or specific texture patterns survive across a longer sequence. Those elements still need the text anchor to reinforce them. Keyframe locking and the anchor block work together; neither is sufficient on its own.
For film and set designers working on AI-assisted pre-vis, this maps directly to the continuity discipline already baked into the craft. Treating the neutral costume reference as the opening frame of every new scene clip is the same logic as a costume supervisor signing off on each setup. Wardrobe consistency becomes a technical parameter rather than a post-generation fix.
"Locking a reference frame as the start of each clip does not replace the text anchor — it reinforces it. The model starts from the right place; the anchor keeps it there."
Prompt Architecture for Multi-Scene Consistency

A three-layer prompt structure is the most reliable way to hold character consistency across multiple scenes without rebuilding your prompt from scratch each time.
Layer 1: Character anchor (fixed across all scenes). The full 40–80 word description developed above. Never edited between scenes. Placed first in every prompt.
Layer 2: Scene environment and action (changes per scene). The camera angle, location, narrative beat, and character pose specific to this frame. Everything that makes this prompt different from the last one.
Layer 3: Style and render directive (fixed across all scenes). Lighting treatment, render engine style, colour palette, and mood. This layer stays as fixed as Layer 1.
The reason the style directive belongs in its own layer, separated from the scene description, is that models tend to reinterpret visual style alongside action when they are written together. "Standing in a rainy street, cinematic, desaturated" prompts the model to associate the aesthetic with the setting. "Standing in a rainy street" followed by a separate fixed style block keeps the render look stable regardless of what the character is doing.
In Stensyl's Canvas, this structure maps cleanly onto a node-based workflow. Build a Canvas flow where the character anchor and the style directive live in a shared text node. Pipe that node's output into each Image Generate node alongside the per-scene prompt. Updating the anchor in the shared node updates every downstream scene at once, which is a practical advantage on longer projects where you refine the anchor after the first generation pass.
A concrete example for exhibition designers: one shared node holds the brand character description and the style directive (flat vector aesthetic, brand palette, clean white ground). Four Image Generate nodes each receive a different booth context: entry hall, product display zone, lounge seating area, exit experience. All four share the same character anchor and style directive from the single upstream node. Change the character's jacket colour once, and all four scenes update on the next generation run.
The common mistake here is paraphrasing the anchor between scenes. Even swapping "crimson" for "red" or "slim" for "lean" introduces variation the model will act on. The anchor is not creative writing. It is a technical specification. Write it once, treat it as immutable, and put all the creative variation into Layer 2.
Three fixed layers, one variable layer. The anchor and style directive never change. Everything else does. That structure is what makes consistency scalable across a full project rather than a lucky coincidence on any given generation.
Model Selection: Which Image Models Hold Character Best
Not all image models interpret detailed character anchors with equal fidelity. Some prioritise creative interpretation and stylistic expression. Others tend to follow precise textual instructions more literally. The difference matters when you have a 60-word anchor block that specifies exact colour codes and costume details.
Community reporting on generative AI platforms suggests that some models handle sequential character consistency better than others, though formal benchmarks comparing models on this specific task are sparse. This is largely practitioner knowledge built through iteration rather than published evaluation. Treat any model recommendation in this space as a strong hypothesis to test rather than a settled verdict.
The practical approach is straightforward: run the same anchor-plus-scene prompt through two or three models in Stensyl's Image generation surface and compare the outputs side by side before committing to a full sequence. Look specifically at facial structure, costume component retention, and colour accuracy against your anchor specification. One round of model selection at the start of a project is worth far more than trying to compensate for drift across thirty generated frames.
For character-focused work, Luma Uni-1 is worth testing specifically. Its reasoning-grounded approach to prompt interpretation means it tends to respect detailed anchor descriptions more literally than models that lean toward stylistic interpretation. That makes it a reasonable default candidate for anchor-heavy workflows, though results vary by subject matter and anchor structure.
When a specific detail drifts despite the anchor, Luma Uni-1 Edit is the correction tool. It handles instruction-based image editing without requiring a mask or full regeneration. If a character comes out with the wrong eye colour or a missing accessory in one frame, you can correct that specific element with a targeted instruction while preserving the overall composition. That is considerably faster than regenerating the full image and hoping the anchor holds better this time.
The most important rule in model selection is also the simplest: decide before you generate scene one, not after. Switching models mid-sequence introduces a new interpretation baseline. Different models encode identity, style, and spatial relationships differently, and the shift compounds any drift that already exists. A sequence generated across two models will almost always look like two sequences edited together.
Organising a Consistency Workflow Across a Full Project
Character consistency at the frame level is a prompt problem. Character consistency at the project level is an organisation problem. The prompting strategies above only hold if the anchor block, reference frames, and model selection are managed consistently from the first generation to the last.
Set up a dedicated Project in Stensyl for any multi-scene character work. Store the master anchor block as a document in Write within that project, and store approved reference frames alongside it. When a team is working across the same project, everyone draws from the same anchor text and the same reference images. There is no version drift from one team member using a slightly different character description than another.
Use Boards for visual consistency checking before any asset leaves the project. Collect all generated frames onto a single Boards canvas and review them as a sequence rather than individually. Identity drift that is invisible when you look at each image in isolation becomes obvious when ten frames are arranged side by side. This is the practical equivalent of an art director's frame review in a traditional production pipeline, and it catches problems before they reach the client or the downstream edit.
For motion designers and content creators producing presenter or talking-head content, the Avatar surface in Stensyl sidesteps the prompt-driven consistency problem entirely for this specific use case. Avatar lets you create a reusable AI presenter from a small set of photos, with no training required. Once the avatar is built, the face is fixed. You are no longer asking a diffusion model to reconstruct the same face from text each time. The identity is bound to the avatar, and the prompt controls what that presenter says and where they appear. For marketing teams running multi-placement campaigns, or content creators producing serialised social output with a recurring host, this is a meaningfully different workflow from anchor-based prompting.
The complete workflow, from first brief to final asset, runs in a single sequence:
- Write the character anchor in Write and store it in the project.
- Build the three-layer prompt structure in Canvas, with anchor and style directive in a shared node piped into each Image Generate node.
- Run model comparison in Stensyl's Image generation surface and lock the model before generating the full sequence.
- Collect all frames in Boards and review side by side for structural and stylistic drift.
- Correct individual outliers using Luma Uni-1 Edit with targeted instructions, no regeneration of the full frame.
- Pass approved assets downstream from the project, with the anchor block and reference frames retained for future sequences.
The discipline-specific applications of this system vary but the structure is the same. Game developers use anchor blocks plus per-angle Canvas nodes to generate character turnaround sheets. Graphic designers pipe mascot anchors into Marketing Studio layouts for carousel and ad creative. Automotive and product teams use reusable concept presenter figures built as Elements or avatars for pitch decks and launch materials. Film and set designers lock costume reference frames in Boards and build pre-vis sequences from that fixed visual foundation.
The system takes about thirty minutes to set up properly on a new project. Once it is in place, every subsequent scene benefits from it. That is the honest case for building it: not that it guarantees perfect consistency on every generation, but that it makes inconsistency the exception rather than the rule, and gives you a clear process for fixing exceptions when they appear.
```Character consistency is a system problem, not a prompt-wording problem. Build the system once. Every scene that follows costs less to produce and less to fix.
Keep reading.

Try Stensyl for yourself
Image, video, 3D, chat, and document drafting. Every AI model, one studio. Plans from £10/month.